OptiX8入门(二)optixTriangle
本人初学者,如有错误和更好的表述,请指出
这次我们看optixTriangle程序
同样分为optixTriangle.cpp、optixTriangle.h、optixTriangle.cu文件
optixTriangle.h文件
其中包含的是参数结构Params和sbt的record信息。
这里注意到有一个hitgroup,这个可以认为是intersection、any hit、closest hit的集合,主要加速编译和光追执行速度。
struct Params
{
    uchar4*                image; //一维数组图像
    unsigned int           image_width; //图像宽
    unsigned int           image_height; //图像高
    float3                 cam_eye; //摄像机位置
    float3                 cam_u, cam_v, cam_w; //以摄像机为原点的笛卡尔坐标轴
    OptixTraversableHandle handle; //用于遍历时加速的句柄,就当做一个参数就好
};
optixTriangle.cpp文件
与optixHello.cpp相近的内容就不写了。
创建context
创建加速结构Acceleration structures
// accel handling
OptixTraversableHandle gas_handle;
CUdeviceptr            d_gas_output_buffer;
{
    // Use default options for simplicity.  In a real use case we would want to
    // enable compaction, etc
    OptixAccelBuildOptions accel_options = {};
    accel_options.buildFlags = OPTIX_BUILD_FLAG_NONE;
    accel_options.operation  = OPTIX_BUILD_OPERATION_BUILD;

    // Triangle build input: simple list of three vertices
    const std::array<float3, 3> vertices =
    { {
          { -0.5f, -0.5f, 0.0f },
          {  0.5f, -0.5f, 0.0f },
          {  0.0f,  0.5f, 0.0f }
    } }; //三角形三个顶点坐标

    const size_t vertices_size = sizeof( float3 )*vertices.size();
    CUdeviceptr d_vertices=0; //分配GPU内存空间vertexbuffer并复制数据
    CUDA_CHECK( cudaMalloc( reinterpret_cast<void**>( &d_vertices ), vertices_size ) );
    CUDA_CHECK( cudaMemcpy(
                reinterpret_cast<void*>( d_vertices ),
                vertices.data(),
                vertices_size,
                cudaMemcpyHostToDevice
                ) );

    // Our build input is a simple list of non-indexed triangle vertices
    const uint32_t triangle_input_flags[1] = { OPTIX_GEOMETRY_FLAG_NONE };
    OptixBuildInput triangle_input = {};
    triangle_input.type                        = OPTIX_BUILD_INPUT_TYPE_TRIANGLES;
    triangle_input.triangleArray.vertexFormat  = OPTIX_VERTEX_FORMAT_FLOAT3;
    triangle_input.triangleArray.numVertices   = static_cast<uint32_t>( vertices.size() );
    triangle_input.triangleArray.vertexBuffers = &d_vertices;
    triangle_input.triangleArray.flags         = triangle_input_flags;
    triangle_input.triangleArray.numSbtRecords = 1;

    OptixAccelBufferSizes gas_buffer_sizes; //加速结构所用到的buffer
    OPTIX_CHECK( optixAccelComputeMemoryUsage( //计算这个buffer所需要的大小
                context,
                &accel_options,
                &triangle_input,
                1, // Number of build inputs
                &gas_buffer_sizes
                ) );
    CUdeviceptr d_temp_buffer_gas; //构建加速结构临时所需要的buffer空间
    CUDA_CHECK( cudaMalloc(
                reinterpret_cast<void**>( &d_temp_buffer_gas ),
                gas_buffer_sizes.tempSizeInBytes
                ) );
    CUDA_CHECK( cudaMalloc(
                reinterpret_cast<void**>( &d_gas_output_buffer ),
                gas_buffer_sizes.outputSizeInBytes
                ) );

    OPTIX_CHECK( optixAccelBuild( //创建加速结构
                context,
                0,                  // CUDA stream
                &accel_options,
                &triangle_input,
                1,                  // num build inputs
                d_temp_buffer_gas,
                gas_buffer_sizes.tempSizeInBytes,
                d_gas_output_buffer,
                gas_buffer_sizes.outputSizeInBytes,
                &gas_handle,
                nullptr,            // emitted property list
                0                   // num emitted properties
                ) );

    // We can now free the scratch space buffer used during build and the vertex
    // inputs, since they are not needed by our trivial shading method
    CUDA_CHECK( cudaFree( reinterpret_cast<void*>( d_temp_buffer_gas ) ) );
    CUDA_CHECK( cudaFree( reinterpret_cast<void*>( d_vertices        ) ) );
}
创建module
注意到这里的module两个参数不一样。
pipeline_compile_options.numPayloadValues      = 3;
pipeline_compile_options.numAttributeValues    = 3;
payload是optixTrace和程序之间传递的信息。
attribute是intersection与any hit/closest-hit之间传递的信息。
这里的3意味着是3个32 bit的数据。
程序使用了payload,因此numPayloadValues不可以变,而numAttributeValues我试着改成2也可以(注意numAttributeValues最小为2)。
创建program groups
创建raygen、miss、hitgroup三个ProgramGroup。
hitgroup创建时有
hitgroup_prog_group_desc.hitgroup.moduleCH = module;
这里moduleCH的CH就是closest-hit。
创建pipeline
创建shader binding table
这里往miss record中设置了背景色。
launch
设置参数后调用了camera的UVWFrame函数,点进去可以看到
void Camera::UVWFrame(float3& U, float3& V, float3& W) const
{
    W = m_lookat - m_eye; // Do not normalize W -- it implies focal length
    float wlen = length(W);
    U = normalize(cross(W, m_up));
    V = normalize(cross(U, W));

    float vlen = wlen * tanf(0.5f * m_fovY * M_PIf / 180.0f);
    V *= vlen;
    float ulen = vlen * m_aspectRatio;
    U *= ulen;
}
W是摄像机朝向,U是摄像机的正上方,UVW形成了一个三维笛卡尔直角坐标系。
显示结果
清理资源
optixTriangle.cu文件
看raygen函数。
extern "C" __global__ void __raygen__rg()
{
    // Lookup our location within the launch grid
    const uint3 idx = optixGetLaunchIndex(); //获取当前的pixel坐标
    const uint3 dim = optixGetLaunchDimensions(); //获取整个场景的坐标
    // Map our launch idx to a screen location and create a ray from the camera
    // location through the screen
    float3 ray_origin, ray_direction;
    computeRay( idx, dim, ray_origin, ray_direction ); //计算光线起点和朝向

    // Trace the ray against our scene hierarchy
    unsigned int p0, p1, p2;
    optixTrace(
            params.handle,
            ray_origin,
            ray_direction,
            0.0f,                // Min intersection distance
            1e16f,               // Max intersection distance
            0.0f,                // rayTime -- used for motion blur
            OptixVisibilityMask( 255 ), // Specify always visible
            OPTIX_RAY_FLAG_NONE,
            0,                   // SBT offset   -- See SBT discussion
            1,                   // SBT stride   -- See SBT discussion
            0,                   // missSBTIndex -- See SBT discussion
            p0, p1, p2 );
    float3 result;
    result.x = __uint_as_float( p0 );
    result.y = __uint_as_float( p1 );
    result.z = __uint_as_float( p2 );

    // Record results in our output raster
    params.image[idx.y * params.image_width + idx.x] = make_color( result );
}
这个optixGetLaunchIndex和optixGetLaunchDimensions不知道是什么意思,我们可以打印出来看看结果。
printf("%d %d %d %d %d %d\n",idx.x,idx.y,idx.z,dim.x,dim.y,dim.z);
截取部分结果分析。
691 41 0 1024 768 1
688 42 0 1024 768 1
692 32 0 1024 768 1
693 32 0 1024 768 1
1024和768分别是整个窗口的宽高,那么可以理解这个idx就是当前的pixel,而且是并行执行的,因为坐标在跳变,而dim就是整个窗口的长宽高。
那我们就可以分析下computeRay函数了。
static __forceinline__ __device__ void computeRay( uint3 idx, uint3 dim, float3& origin, float3& direction ) //device指的是在GPU端执行
{
    const float3 U = params.cam_u;
    const float3 V = params.cam_v;
    const float3 W = params.cam_w;
    const float2 d = 2.0f * make_float2(
            static_cast<float>( idx.x ) / static_cast<float>( dim.x ),
            static_cast<float>( idx.y ) / static_cast<float>( dim.y )
            ) - 1.0f; //2*x-1即将[0,1]区间的比值变为[-1,1]的位置,即该像素在整个窗口的位置

    origin    = params.cam_eye;
    direction = normalize( d.x * U + d.y * V + W ); //从(0,0,2)摄像机处发射向XOY平面
}
进行optixTrace后,在空间中会触发miss函数或closesthit函数。
如果没有与物体相交,触发miss函数,直接填充背景色。
extern "C" __global__ void __miss__ms()
{
    MissData* miss_data  = reinterpret_cast<MissData*>( optixGetSbtDataPointer() );
    setPayload(  miss_data->bg_color );
}
如果与物体相交,触发closesthit函数。
extern "C" __global__ void __closesthit__ch()
{
    // When built-in triangle intersection is used, a number of fundamental
    // attributes are provided by the OptiX API, indlucing barycentric coordinates.
    const float2 barycentrics = optixGetTriangleBarycentrics();

    setPayload( make_float3( barycentrics, 1.0f ) );
}
这里的optixGetTriangleBarycentrics是求该位置在当前三角形的重心坐标,是一个float2类型,说明是u*AB+v*AC的向量类型,setpayload函数就是写一个信息以便后续调用。
static __forceinline__ __device__ void setPayload( float3 p )
{
    optixSetPayload_0( __float_as_uint( p.x ) );
    optixSetPayload_1( __float_as_uint( p.y ) );
    optixSetPayload_2( __float_as_uint( p.z ) );
}
那么在raygen中获取到payload便可保存结果。
float3 result;
result.x = __uint_as_float( p0 );
result.y = __uint_as_float( p1 );
result.z = __uint_as_float( p2 );

// Record results in our output raster
params.image[idx.y * params.image_width + idx.x] = make_color( result );
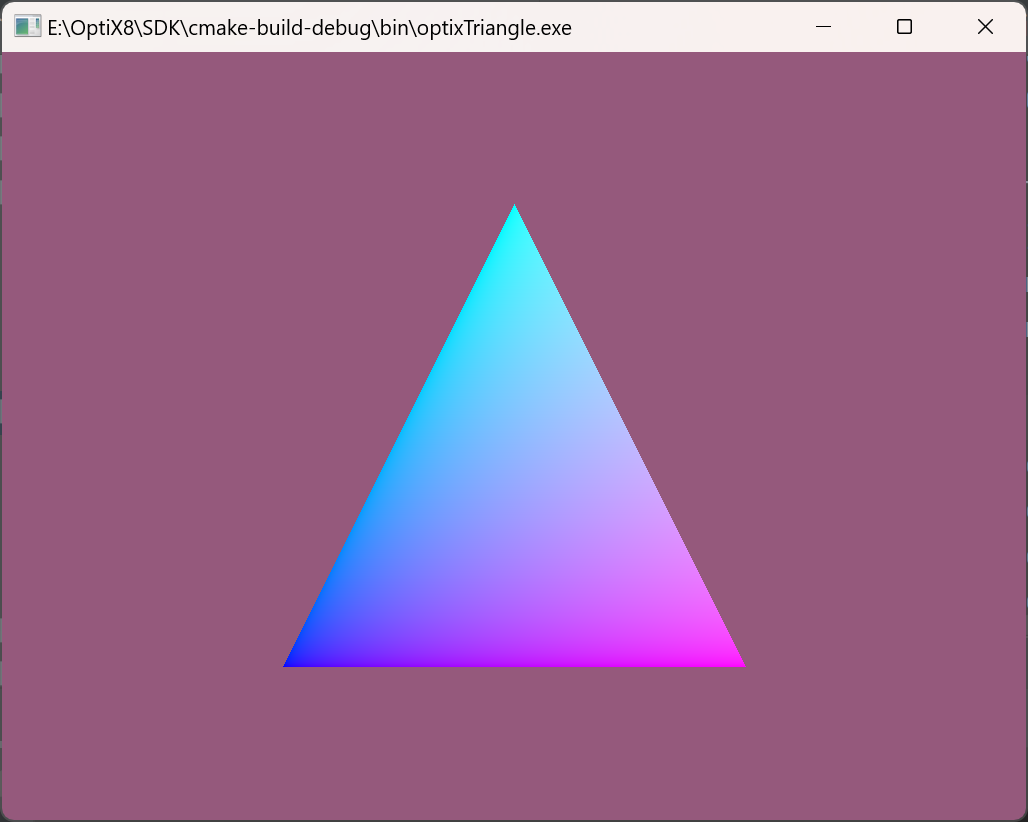
执行结果:

码字不易,点个赞吧
总结
生成三角形后,光线往每一个pixel中发出射线,如果打到三角形上,则计算重心坐标生成颜色,否则填充背景色。
参考资料